Winter is coming! The cooler weather and shorter days will be arriving soon and so will be all the great features that are delivered this time of the year with the Salesforce Winter ‘20 release.
As the 540 pages(!!) of Winter ‘20 release notes can be daunting to most, I will make your life easier by providing a concise summary of some of the must-know features that are being delivered as a part of this release.
Please note that the Winter ’20 release is currently available under the pre-release program. You can perform your R&D with these features in a trial org by signing up here:
https://www.salesforce.com/form/signup/prerelease-winter20/
All sandboxes will be upgraded with this release on September 6th & 7th.
Without further ado, let’s check out the 20 true gems offered as a part of this release:
ADMIN Centric:
- Contacts: Customize Opportunity Contact Roles for Better Tracking and Reporting
Opportunity contact role customization options give you the flexibility to track and attribute revenue to roles, titles, and individuals. With custom fields and page layouts, validation rules, and Apex triggers, you can design an Opportunity Contact Role to match your specific sales and reporting processes. You can capture new data, such as titles and roles, to help your sales reps be more efficient in targeting the right contacts.
For example, a nonprofit organization can create a custom opportunity contact role called “personal donor” that allows it to track donations directly from individual donors. The organization can then identify its best donors and set up triggers to send thank you emails or other communications based on donation amounts or contact changes.

- Accounts: Customize Account Teams to Better Support Team Selling
Use customizable account teams to manage complex account relationships better in Salesforce. Collect more information by adding custom fields, buttons, and links to account team layouts. Use validation rules, Apex triggers, Process Builder, and workflow rules with account teams to help keep data clean and minimize manual data entry. You can now report on account teams, too.
- Set Record Page Component Visibility Rules Based on Device
For components on record pages, you can now show or hide a standard or custom component on a record page based on the device it’s viewed on.
How: From the component’s properties pane, click Add Filter, then click Device.

- Control Who Gets Read Access to Custom Metadata Types
Use profiles and permission sets to assign read access to users for custom metadata types. As of Spring ’19, you can block all API read access to custom metadata types for users who don’t have Customize Application permission. Now you can grant API read access to specific metadata types for users and user profiles, even if they don’t have the Customize Application permission.

- Filter Reports Using Field Comparisons with Field-To-Field Filters (Beta)
Filter a report by comparing the values of two different report fields. For example, see which cases were modified after the closing date by filtering on cases with a last modified date after the closed date.
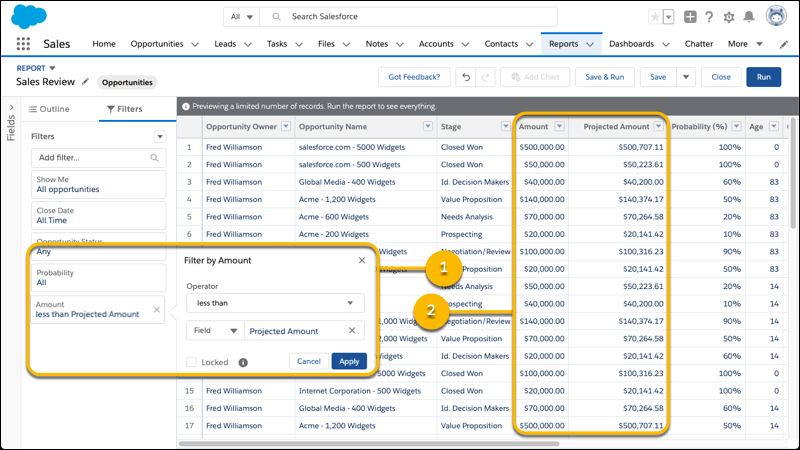
- Count Unique Values in Report Results (Beta)
See how many distinct values your report returns with a unique count. For example, opportunity reports often list multiple opportunities with the same account. Add a unique count to the Account Name column to see how many individual account values appear in the report. Unique counts appear as grand totals at the bottom of the report and as subtotals for each group.

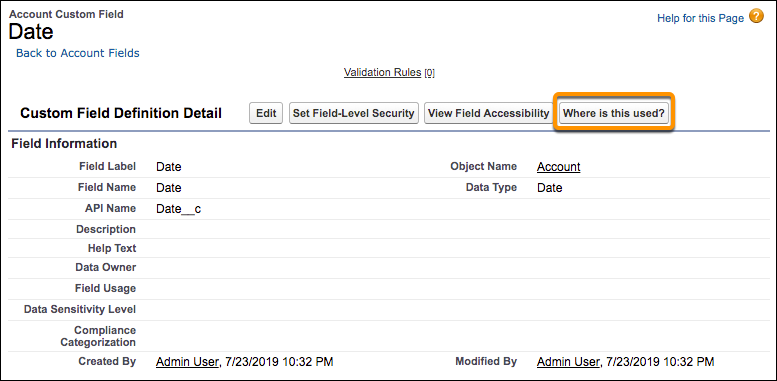
- Check a Field’s References and Find Reports Using It (Generally Available)
With the click of a button, view the references to a custom field before you edit it, such as references in a formula, layout, or Apex class. On a custom field’s detail page, click Where is this used? to see where a field is used and where changes to the field appear. Use this information to communicate changes to others who use the field in a formula or other context. In this release, we added support for reports.

- Install Even More Custom Objects in Your Org
Salesforce did it again: They raised the total hard limit for custom objects in an org to 3,000 (up from 2,500 in the previous release) so that you can install more custom objects from packages.
- Access the Recycle Bin in Lightning Experience
You no longer have to switch to Salesforce Classic to access the Recycle Bin. You can now view, restore, and permanently delete the items in your Recycle Bin and the org Recycle Bin.
- Add Tabs and Accordion Components to Your Home Pages
You can now use the Tabs and Accordion components on Home pages in Lightning Experience. You can create, update, and delete tabs, then change their order. Or, use the Accordion component to organize your components into collapsible sections. For both Tabs and Accordion, you can configure the tabs or sections that your users see, name them whatever you like, and add components.
- Get Accurate Daylight Savings Time Values with DATEVALUE()
The DATEVALUE() formula option provides more accurate daylight savings time values without workarounds. The option avoids an existing one-hour discrepancy when processing times between 11:00 PM and 1:00 AM.

- Put the Pro in Profile with Profile-Specific Search Results Layouts (Beta)
Search results should show what matters most. If you’re in sales, knowing the account owner and the industry is critical. If you’re a service rep, the account’s support level is key information. With profile-specific layouts, you can fine-tune search results layouts for an object for each unique profile in your org. Profile-specific layouts are supported only by objects with customizable layouts. Users who don’t have a profile-specific layout assigned to them see the default search results layout.
- Exciting Flows Enhancements:
- Make Your Flow Screens Dynamic with Conditional Visibility
Save your users time by showing them only the fields they need when they need them. Add filter conditions and logic to a flow screen component’s properties to show or hide that component based on what a user enters or selects for flow resources like picklists or checkboxes. - Control Users’ Ability to Run Individual Flows Using Profiles and Permission Sets
Previously, users with the Run Flows, Manage Flows, or Flow User permission could run all flows. Now you can control which flows users can run by restricting access to enabled profiles or permission sets. - Configure Screens and Get Records Elements Without Creating Variables
When you add a screen component or a Get Records element to a flow, we automatically create variables to store the output values. You no longer have to create and assign variables, but you can still opt to do so. Get Records elements and screen components that were created before Winter ’20 aren’t affected by this change. - Help Your Users Search for Records in Flows
Let users search for a record the same way they do everywhere else in Salesforce by adding a Lookup screen component. - Automate Account Team Creation with Process Builder
Configure a process action to add team members to an account. You can also configure a process to run when an account team member record is created or edited. - Set Your Own Flow Test Coverage Requirements
The flow testing coverage requirement is now independent from the 75 percent code coverage requirement for Apex. Set your own minimum test coverage percentage for flows in a new process automation setting.


DEVELOPER Centric:
- Hitting Apex Limits in Server-Side Actions Is More Predictable
Apex limits in Lightning components are now applied per action. Previously, the Apex limits applied across all the actions batched together (boxcar’ed) in a request (XHR).
Where: This change applies to Aura components and Lightning web components in Lightning Experience, Salesforce Classic, Lightning communities, and all versions of the Salesforce app.
Why: Applying Apex limits per action makes it less likely that your components hit Apex limits. Apex limit issues for an action are more predictable because the limits are based on one action rather than the unpredictable set of actions that the framework batches together in a boxcar.
- Communicate Across Salesforce UI Technologies with Lightning Message Service (Developer Preview)
Use the Lightning Message Service API to communicate across the DOM, between Aura components, Visualforce pages, and Lightning web components. If you’re switching from Salesforce Classic to Lightning Experience, you can now build Lightning web components that can communicate with existing Visualforce pages or Aura components.
Why: In Lightning Experience, you often have multiple components on a page. Previously, if you wanted a Visual force page to communicate with a Lightning web component in Lightning Experience, you needed to implement a custom publish-subscribe solution. Now, you can use the Lightning Message Service API to handle that communication.
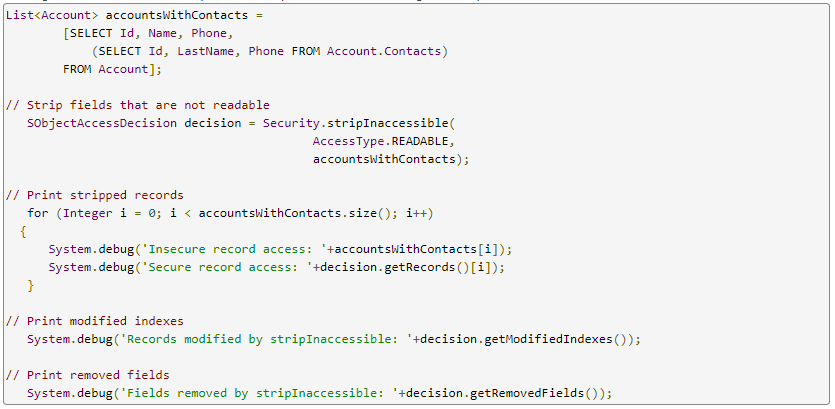
- Enforce Field-Level Security in Apex (Beta)
The strip In accessible() security feature for field-level data protection has moved from pilot to beta and is available in production orgs. In Winter ’20, we extended the feature for sub queries and added the enum value UPSERTABLE to System. Access Type. Use this new enum with the strip In accessible method to enforce field- and object-level checks for both insert and update.
- Add Powerful and Performant Lightning Web Components to Your Flow Screens
The powerful features and performance benefits of Lightning web components have come to flow screens. You can now integrate components that your developers have built or find them on App Exchange for use in your flow screens.
- Apex: New Classes
These classes were introduced in this release:
- Formula Class in the System Namespace
The new System.Formula class contains the recalculate Formulas method that updates (recalculates) all formula fields on the input sObjects.
- Formula Recalc Field Error Class in the System Namespace
The new System.Formula Recalc Field Error class is the return type of the Formula Recalc Result. get Errors method. It contains methods that retrieve the name of the error field and a message describing why the formula calculation failed.
- Formula Recalc Result Class in the System Namespace
The new System.Formula Recalc Result class is the return type of the formula recalculate Formulas method. It contains methods that return the sObject with formulas recalculated and errors encountered while recalculating formulas on the sObject.
- Expand Apex Testing with the Apex Settings Metadata Type
Use the new Apex Settings metadata type to augment Apex testing with aggregate total tracking, serial execution, and prevention of auto-number gaps. You can also use Apex Settings to suppress debug log details in unhandled exception emails.
How: You can use the Apex Settings metadata type in many ways.
- To enable tracking of aggregate, instead of detailed, totals for Apex test coverage data, use the new enable Aggregate Code Coverage Only
- To enable serial execution of Apex tests, use the new enable Disable Parallel Apex Testing
- To suppress Apex debug log details in unhandled exception emails, use the new enable Do Not Email Debug Log
- To prevent Apex test executions from incrementing auto-number fields for non-test records and creating gaps, use the new enable Gapless Test Auto Num
- Add Lightning Web Components as Custom Tabs
Make a Lightning web component available as a custom tab in a Lightning Experience app and in the Salesforce app.
How:
- Add the lightning__Tab target to the component’s configuration file. The <component>.js-meta.xml configuration file defines the metadata values for the component, including the setting to allow usage in a custom tab.

- Create a custom tab for this component.
- To display the component in a custom tab:
- For a Lightning Experience app, add the component to the App Launcher
- For the Salesforce mobile app, add the component to the Salesforce app navigation menu.
So what are you waiting for? Get the pre-release trial org and start playing around with these amazing features!