
I have always found Flows to be easy to conceptualize, challenging to build, and tricky to troubleshoot. Don’t get me wrong because it is, beyond a shadow of doubt, an incredibly versatile feature but if not implemented right, it might get frustrating to deal with the resulting issues later. And that is exactly the reason why I try my best to follow certain best practices when building Flows:
-
BULKIFY YOUR FLOW
Flows are subject to governor limits and similar to Apex, you need to ensure that the Flows respect those limits otherwise there can be consequences. Be it auto-launched flows or screen flows, both should be designed in a manner where they only query, create or update the needed records and do not perform a superfluous action. Listed are a few ways via which you can improve Flow optimization:
a.) Always prefer the Fast elements over Record elements(Fast Lookup, Fast Create, Fast Update)
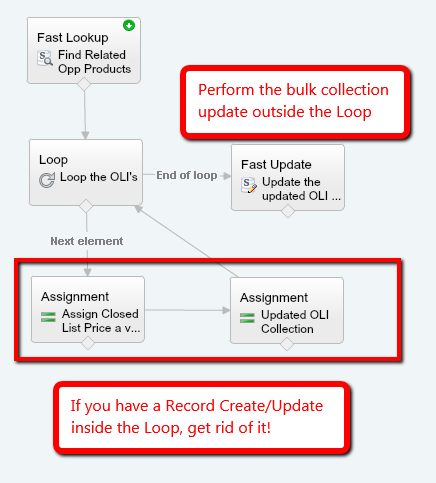
You must have come across the common governor limits in Apex. For example, one should never do a SOQL query or individually insert/update Sobject variables inside a For loop otherwise a SOQL 101 error or > 150 DML operations in a single transaction issue becomes inevitable. Remember that when you are creating Flows, you are sort of writing Apex via the UI so similar concepts/limits apply to Flows as well. A Record Lookup or Record Update or Record Create element should be avoided inside a Loop element at all costs. Let’s assume a scenario where you have to do a bulk update on Opportunity Line Items within a Flow. One way is to loop through the Opportunity Line Items collection and update each element within the Loop using a Record Update element. But that would be bad design. Reason? If someone performs a bulk upload of 200 records using Data Loader and that triggers our Flow to update the corresponding Line Items, the upload would fail with the “Too many DML statements: 151” error. And this is why we must use Assignment elements to store each updated Opportunity Line Item in a collection variable and then save the bulk update to be handled outside the Flow by using a Fast Update element.
Using the Fast Element as a Best Practice b.) Be specific with Process criteria when working with Auto Launched Flows
When working with Auto Launched Flows, you should always limit your Process criteria to only work on records which need Processing. Unlike workflow rules which aren’t subject to governor limits, you cannot be lax when designing Process criteria. For example, let’s say our Process is launching a Flow that updates a field on a record. Once the field is updated, there is no need for it to be updated again via the Process/Flow. If your current criteria looks like the following:
AND(
[Account].RecordType.Name = ‘ABC’,
TEXT([Account].Industry) = “Agriculture”
)Then do consider changing it to:
AND(
[Account].RecordType.Name = ‘ABC’,
TEXT([Account].Industry) = “Agriculture”,
ISBLANK(Field_to_be_Updated__c)
)The latter will only fire in certain instances where the Field_to_be_Updated__c hasn’t been already updated by our Process/Flow. Saves us some unnecessary transactions, doesn’t it? I would recommend evaluating all such Processes for criteria optimization. in your org that launch a Flow.
c.) Use Decision elements to only Update when needed
The above optimization shouldn’t be limited to the Process criteria only and must be transmitted to the Flow as well. Be it auto launched or a screen flow, only the records that need to be updated, should be evaluated and updated within the Flow. A great way to ensure such behavior is to use a Decision Element prior to the Record/Fast Update and only modify those records that need an update. Again, having an update where a Flow is called everytime a record is edited (rings a bell?) is bad design unless it’s really needed.
Here are some other great tips on overcoming the governor limit issues related to Flows:
Receiving “Too many SOQL queries: 101”Now if your Flow still fails after following all of the above guidelines, I am afraid that the only option is to enter the world of Apex. So either build the entire logic using code or invoke the Apex method from within the Flow by using Invocable Actions.
-
PERFORM NULL CHECKS
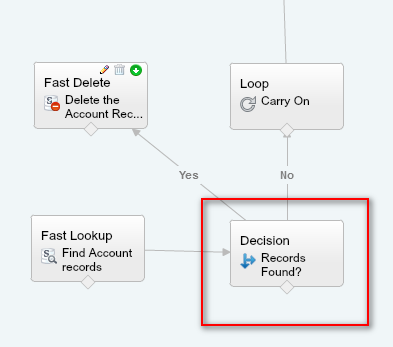
Since I have already covered this in a previous post, I will simply link you to it. As explained in the #4 of the linked post, NULL checks need to be handled extremely well within Flows so try to plug them into as many areas as possible. When it comes to Decision elements, it’s always ‘the more the better’. So the more the number of relevant Decision elements in your Flow, the lesser are the chances of the Flow failing due to hitting governor limits or missing a NULL check.
Importance of a Decision Element 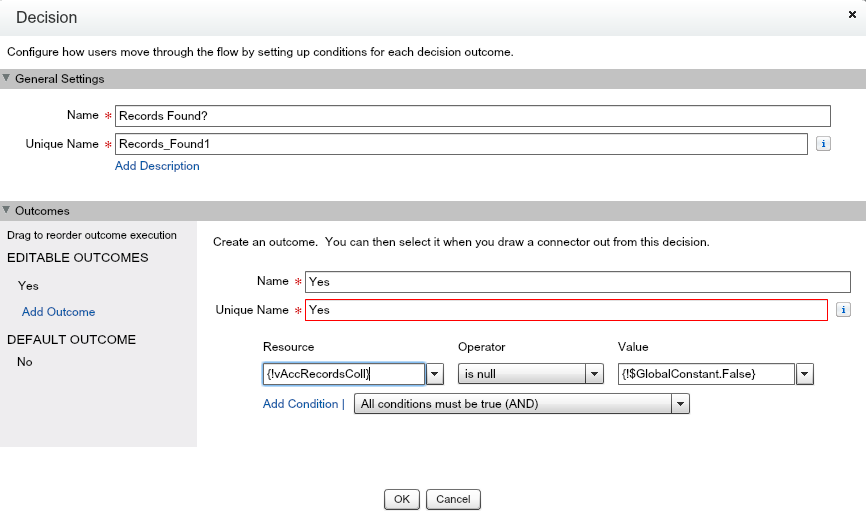
Decision Element – NULL check David Litton has written a great post about the importance of using Decision Elements in Flow and I suggest giving it a read.
-
USE FAULT ELEMENT
Salesforce sends the last modifier on a Process/Flow (usually an Admin) a nice comprehensive E-mail with the exception details if the Flow fails. Now this is a great feature that Salesforce added recently to help debug/troubleshoot Flows but this is what it looks like to the front end user when working with Screen oriented Flows:
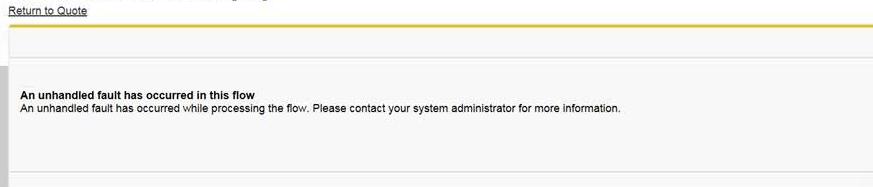
Flow Error Not too graceful exception handling, right? Users working with Screen Flows should always be displayed a better and more sensible error message when the Flow fails. Here’s a fantastic help article from Salesforce that explains how to handle such exceptions:
Customize the Error Message for Running Flow Users (Best Practice)Following is a great resource as well:
Other Examples of Error Handling in Flows
-
USE STEP ELEMENT
Think of the STEP element as a sticky note or a placeholder that is used to illustrate the logical flow of a business process. It doesn’t hold any value in an active Flow but is definitely useful when doing the initial design of a Flow. Let’s say a stakeholder or a product owner is interested in viewing the series of steps based on which the Flow will be built. Without actually building out the Flow, you can create a rough draft using the STEP element and demonstrate it to the stakeholders. Once approved, you can then hover over the STEP element and convert it into Screen elements using the double arrows. When working with Screen Flows, it is recommended that you first build a visual prototype using STEP element to provide more clarity into the future modifications/design.
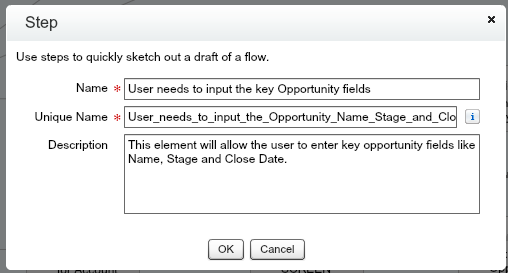
STEP Element – I 
Convert STEP element to a Screen -
DOCUMENT YOUR FLOW
Even though this is listed last, it is one of the most important Best Practices to be followed when building Flows. Flows have a clunky user interface in my opinion and you should always strive to make the Flow related descriptions to be as comprehensive and elaborate as possible. And this documentation shouldn’t be limited to the Flow component itself and should also be extended to all internal Flow elements. The future admins would certainly thank you for doing this.
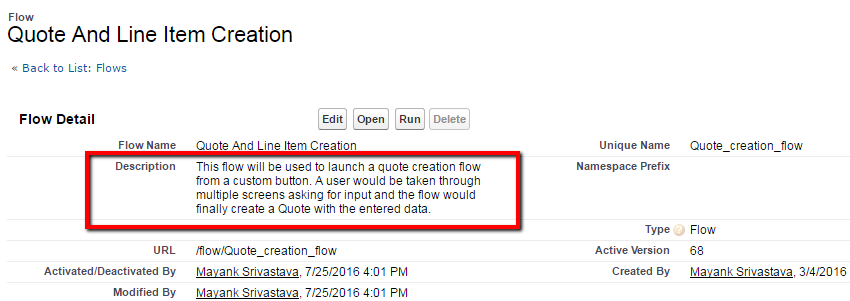
Flow Description 
Flow Element Description. Do this for every single element in the Flow.
I can assure you that if you follow the above best practices to the hilt, you can avoid majority of the common issues associated with Flows. I strongly feel that Salesforce still has loads of improvements to make to both Process Builder and Flows to make them as robust and user friendly as other stable features like Workflow Rules but I definitely like them for the powerful capabilities that they offer; something that could only be accomplished via Apex/Visualforce in the past. Please feel free to share any other best practices that you deem necessary when working with Flows.
Until the next post, Happy Flow’ing!


